Tuesday, November 21, 2017

A Word About Stuffing

Thanksgiving is a good time to talk about stuffing . . . 

not the stuffing you eat, the stuffing you use for sewing projects like pillows and fluffy toys. I've tried all kinds. When I used to make things to sell, I bought giant rolls of stuffing from a furniture maker and it was fantastic. If you don't need a bale of stuffing, my favorite by a long shot that is locally available is Morning Glory Brand Premium Polyester Fiberfill. I can usually find it at Walmart. It gives me a smoother result and doesn't clump like some other products do. It's a little more expensive, but worth a few extra pennies for the end result.


I also like Morning Glory Cluster Stuff for some projects. My local Hobby Lobby carries it. It's in small pieces, so it's next to impossible to pack it too tight or for it to clump, and trust me, I've tried. It's more difficult to use in stuffed toys because it's hard to get into tight places, but I love it in pillows and larger projects because it's easier to stuff firmly without the lumps and bumps and the pillow still stays soft.


Any other favorites out there?


Thursday, November 16, 2017

Apron Anyone?

If you need an easy gift for your favorite friends, you can't go wrong with Simplicity 2492. There's not much to say, except that this pattern sews up quick and looks darling. It only takes a yard to 1 1/4 yard of fabric. Rick-rack trim adds some interest and the bias tape is an easy application to finish the edges. I've made this apron with all sorts of prints and trim colors and I love how it turns out every time!


Tuesday, August 22, 2017

Bohemian Booties

There is nothing I like more than a pair of soft, cozy slippers (unless it's a tall, cold glass of ice water or a pair of new socks). I used this cute pattern to make a pair of slippers for a sweet friend.


The pattern is by Amanda Herring from The Quilted Fish and sadly, I learned as I was writing this post that the pattern doesn't appear to be available any more. (Hopefully there are a few copies floating around the Ebay or Etsy universe.) There are similar patterns out there though, and some of them are free. Yay!

The construction was a little tricky with some curves and tight spaces, but they turned out so cute!


The soles are a soft suede. After a lot of easing and clipping, it all worked out in the end, but the sole pattern seemed a little small for the bootie pattern since there's not much (or any) give to the suede. So, if I were you, I would wait to cut the sole pattern until you have the slipper top constructed. You will thank me later when you get a better fit and don't break out in a sweat trying to make it work! I used paper clips to hold everything together since I didn't want to stick pins in the suede. I'm sure there are better methods out there, but they worked and I had them around the house. Also, my sewing machine and the suede didn't really get along. You might want to think twice about using suede if you make them. I like it because it is more durable than the usual slipper bottom fabric.

You can't see it from the photo, but there is an elastic and button detail on the side of the slippers. I didn't see the elastic measurement in the pattern, so I emailed the designer and she told me that she used a coated hair elastic (like these) AdorableI used the thinner type since I was already sewing through soooo many layers. 

I love the cotton print I used, but unless you are only going to wear your slippers while sitting in your lounge chair, eating bon-bons and watching a romantic comedy, I would recommend using a darker fabric than I did!


Wednesday, July 12, 2017

Australia

I have not been sewing as of late because I have been to Sydney, Australia. My son married a beautiful Australian and we were lucky enough to go to their wedding reception there. The opera house, the Harbor Bridge, the beaches and everything else is stunning. I'm still trying to recover from jet-lag and hoping to get back in the swing of things soon. Until then, please enjoy an amazing view of beautiful Bondi Beach along the Bondi to Coogee walk. If it's not on your bucket list, it should be!


Friday, June 9, 2017

More Doll Clothes . . .

More doll clothes for my granddaughter's American Girl doll she got for Christmas. There are so many patterns out there and unlimited options. Doll clothes are the perfect way to use up stash fabric and scraps, which is why I save so many of my scraps. Besides, I feel so thrifty when I use something I already have.

I used McCall's 7031 for this combination. The pattern was easy. I think the hardest part was sewing on all the buttons, but even that was a cinch. 

Pattern Link Here

What doll wouldn't look cute in this bright pink jacket and gray striped pants?


Monday, May 22, 2017

Baby Boy Geometric Quilt

Maybe it's just me, but sometimes I feel like it's hard to find cute patterns for little boys. It was over a year ago that I searched far and wide for a pattern to make a quilt for my new grandson. His mamma doesn't love traditional baby prints and I wanted to do something simple. This pattern by Missy Mack Creations on Etsy was the perfect choice.

Find Pattern Here

It's versatile and simple and would work with many different solids or prints. I used 100% cotton solids in complimentary white, grays and blues. The back is a dark gray. I had a quilt shop do the quilting, but apparently it's hard to stitch straight lines with a quilting machine. Honestly, I tried to make myself leave it, but some of the crooked stitching got the best of me and I ended up taking most of it out and doing it myself, stitching the width of the pressure foot on either side of the seams, vertically and horizontally.


The pattern is well-done and the designer offers a great way to cut and sew the squares that simplified things so much. I can only imagine how frustrated I might have made myself if I had made the quilt the way I had planned by cutting all the squares and then triangles individually. The hardest part for me was the layout and getting various colors and angles where I wanted them. After it was quilted, I noticed a few squares I wish I'd put somewhere else, but you live and you sew and you learn, right? I'm happy with the result and more than happy with our sweet grandson!

Wednesday, April 26, 2017

Deluxe Lemon Squares

I set my sewing projects aside while I prepare for my son's wedding, but I made some lemon squares over the weekend and wanted to share. I've been using the same recipe since I was young. My 4-H sewing group was also a cooking group and I started making them many moons ago.


For full disclosure, I hate getting lemon squares out of the pan and this time was no exception. It reminded me a little of my husband's patio project last summer when he jack-hammered our old concrete. I think I might try the tin foil method again the next time I bake these. I didn't have great success when I used it before, but I'm thinking it has to be easier than trying to get the sugary edge of the lemon squares away from the pan. These lemon squares are scrumptious, so in the end it's worth the effort. Enjoy!

2 cups flour
1/2 cup powdered sugar
1 cup buttered, softened
2 cups sugar
4 eggs, beaten
1/3 cup fresh lemon juice (don't even think about using the bottled lemon juice) 
1/2 teaspoon baking powder
1/4 cup flour

Preheat oven to 350. Mix the 2 cups of flour with the powdered sugar. Cut in softened butter (like a pie crust). When you have course crumbs, press in a well-greased 9x13 inch pan. Bake at 350 for 15-20 minutes or golden brown on the edges. While baking, beat eggs, and add sugar and lemon juice. Mix together 1/4 cup flour and baking powder and stir into lemon juice mixture. Pour over baked crust and return to oven for 20-25 minutes. Remove from oven and let cool. Dust with powdered sugar. Cut into bars and serve. You might want to keep your leftovers in the refrigerator, if there are any.

Friday, March 31, 2017

Belle of the Ball 18" Doll Dress

Bonjour! With the new "Beauty and the Beast" movie in theaters, what little girl wouldn't want her doll to dress like Belle? This dress is based on the older, animated version of Disney's "Beauty and the Beast" and was made from pattern Simplicity 1581. (I found this pattern of the new version that includes a doll dress at Hobby Lobby and it was on sale for 99 cents.It's currently back-ordered on the Simplicity website.)


As with most doll clothes patterns, it was a little short on instructions, but everything worked out fine in the end. I omitted the ribbon trim at the bottom because it looked bulky and Belle didn't have any on her dress;) I didn't love hand sewing the covered buttons to the drape on the skirt, but I'm impatient. I think they look cute though. I was going to do ribbon roses, but this fabric is more of a gold yellow and I couldn't find anything to match. Everything was made from scraps in my overflowing bins, but the main dress fabric is a washable satin and the matching lace is washable as well. There are some shoulder straps on the pattern you can't see in this photo because of the lace. There is also darling slip underneath that's hard to see, but really easy to make. If the little girl in your life needs a Belle dress for her favorite doll, please be my guest!


Friday, March 17, 2017

A Home for Max Quiet Book

I've been contemplating making a quiet book for the grandchildren for a long time. When my darling grandsons, Miles and Vaughn, both had birthdays coming up, I decided it was now or never. There are lots of patterns and page ideas out there, but I finally decided on this one from LindyJ Design:

See pattern here

The story follows Max the dog through different scenes as he looks for a new home. They are a lot of work due to the detail on each page, but that's what makes them so cute.


The pattern was great and the instructions were clear. (She has sooo many other patterns that are adorable! If I made them all, I might be able to use up my felt stash. Or maybe not.) 

The designer offers a quick and easy method for applying the pattern to the materials. It's a freezer paper method and you can actually print the pattern on the freezer paper pages cut to 8.5 x 11. From there you iron the pattern right onto your fabric, which makes it easy peasy to cut those little pieces out. (Thank you LindyJ!) That saved so much time over tracing or laying the pattern pieces on the various fabrics and felt. My poor printer struggled to pick up the pages when I loaded them all at once. When I fed them through one at a time though, it worked like a charm! 

I made a few modifications to the pattern. I'm fussy about unfinished edges, so I bound the edges of the finished pages with a continuous binding that I fed through my handy dandy bias tape maker. (There is a tutorial here. Let me tell you, when you start cutting you won't believe your eyes when you see how much binding you get.) I found the binding fabric at Hobby Lobby. Because I bound the pages, I had to adjust some of the background pieces so they extended all the way to the one alternating side and the top and bottom edges of the felt.  

I also used extra-large Dritz eyelets to loop the binder rings through because I didn't want someone pulling too hard and ripping the page after all that work. 

I hope my grand-babies love them for a long time!

Monday, March 13, 2017

Fun and Fashionable Doll Clothes

When your darling granddaughter asks for some doll clothes for the new 18" American Girl type doll she got for Christmas, how can you say no? I've been busily sewing for her ever since. 

McCall 6480

I used View B. For the skirt I selected some pre-ruffled yardage I've had for years and was thrilled to put to use. All it took was an elastic casing and a seam. The jacket fabric is from Jo-Ann's fancy fabrics and the silver dot t-shirt yardage comes from Hobby Lobby. I made the snazzy boots from some leftover vinyl. 

Small seams and tiny pieces can be challenging, but doll clothes are usually quick and this pattern was easy to follow. I always try to use scraps on hand, but even if you have to buy fabric, it's usually such small amounts they don't end up costing much. I've made several pieces from other views of this pattern, so it's a good value, especially when you buy it for 99 cents.  


My granddaughter was so excited when I gave the clothes to her and to be honest, I could probably make hundreds of outfits from my incredibly large stash, so I'm not done yet!

Sunday, March 5, 2017

Lunch Anyone?

If you have someone in your life who doesn't eat school lunch and you feel guilty about all the paper and plastic bags you're throwing away, Simplicity 1385 is great choice for a lunch sack. 

See here


I've made it several times in all different types of fabric, but I love the way the camo bag turned out. (I've also made the hobo style and it's awesome too and a little more feminine. I'll post that review at a later date.) The pattern specifies an insulated fleece such as Pellon Insul-Fleece, which helps keep the cool inside. 

These handy bags are just the right size for a small water bottle and a reusable sandwich container from the dollar store, plus some room left over for a snack. It's a super easy pattern with several other bags, so it's a great value. This bag is a fun and earth friendly choice for all your favorite lunch buddies! 

Friday, February 24, 2017

Easy Minky and Flannel Blanket Tutorial

If you need a quick shower gift or something special for a new baby, you can't go wrong with a soft, cuddly blanket. There's nothing softer than minky fabric and flannel is the perfect compliment. Minky fabric can be expensive, but if you make the blankets 30 x 36 inches, you can get two from 1 1/8 yards. 

To make this blanket you will need:
1 1/8 yards minky fabric 
1 1/8 yards flannel
Thread
Basic sewing supplies

It's always a good idea to wash and dry both your fabrics. They will shrink at different rates and washing ensures that your blanket will keep its shape.

Begin by cutting the selvages off the minky and the flannel. Use a rotary cutter if you have one, but you can also use scissors. 


Cut the minky piece in half down the fold. Most minky is at least 60 inches wide, so that will give you two 30 inch wide pieces. Set one piece aside and cut the length of the other piece to 37 inches to allow for a half inch seam. You will now have a piece of minky that's 30 (or so) inches wide x 37 inches long.


You can cut the flannel to match the dimensions of the minky fabric with the rotary cutter and mat, or you can open the flannel on a flat surface, lay the minky fabric on top and trim the edges to match.


With the fabrics right side together, pin every 3 or 4 inches around the entire edge. Minky is slippery so you won't want to skip this step! 
Using a half inch seam, sew around the edges, leaving an opening of 5 inches or so on one edge for turning. 

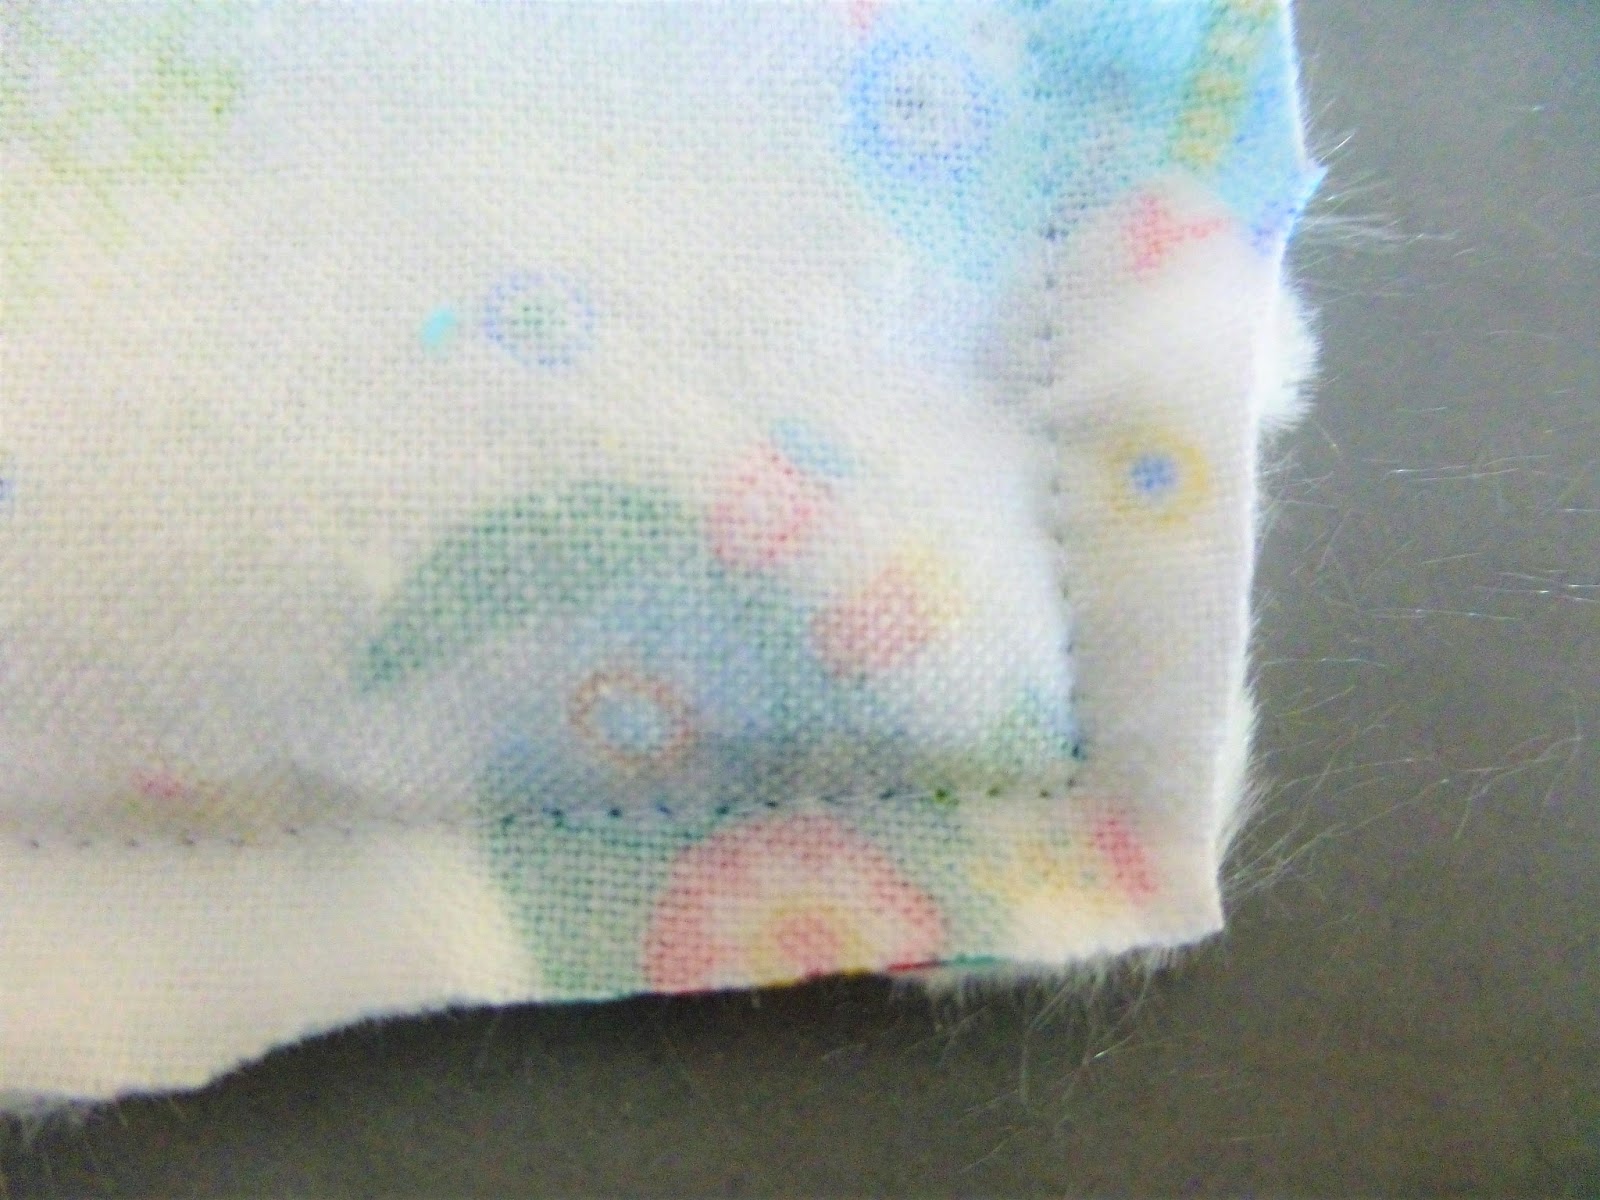
Lightly trim the four corners. 
Reach inside an turn the blanket right side out. 
Push the corners out with your fingers.
Carefully press the edges. Whatever you do, do not press the minky side. Note: You may want to skip this step if you're using the dimple dot minky. 
Whip stitch the opening closed.
If you have any edges tucked in the seam, you can pull them out carefully with a seam ripper.
Sew around the blanket 3 inches from the edges all around. (I make a mark with tape on my sewing machine as a guide.)
Sew on the diagonal from each corner to the stitching line you just made. 

That's all there is to it! Wrap it up or tie it with a bow and you're set. These blankets are so easy you will want to make a few to have on hand.


Beatrix Bunny with Case and Clothes

What do you call a rabbit with no clothes on? A bare hare.

A while ago I posted a stuffed elephant and trunk I made for my granddaughter's birthday. See here

When another granddaughter wanted a case like here sister's, I remembered Ruby Jean's Closet had a cute bunny too.

Pattern Here

I made Beatrix and the whole kit and caboodle.  


When sewing the case, pay careful attention to the application of the interfacing. It's probably the most time-consuming part of the whole process. 


The bunny is a made from a quilting cotton with faux suede for the nose and hand patches. 


I may or may not have wanted to pull my hair out during the construction process, but I've made four dolls and cases now and little girls love them. They're a great quiet toy they can take with them easily because everything is contained. All the clothes were made from scraps I had on hand, and that is never a bad thing!


Sunday, February 19, 2017

Natalie Bucket Bag

A girl can't have too many bags! Right? This Natalie Bucket Bag by ithinksew was the perfect choice for a young friend's thirteenth birthday.

See pattern here

I loved the designer's leather accents, but opted for a darling printed duck fabric from Hobby Lobby. With a 40% off coupon, it was also a great economical choice. The bright pink lining pant-weight fabric I had on hand added a little spunk to the project.


I made the finished bag a backpack rather than going with the designed shoulder strap. That process was easy. The only thing I would do different would be to add a loop at the top for easier hanging.

For the adjustable backpack straps, I used two one inch Dritz D rings and two one inch Dritz slide adjusters. I cut two four by thirty-two inch strips and followed the steps below prior to sewing the lining and bag bottom.

1. Fold both strips in half and press. 


2. Open straps and press each side into the center and press.


3. Fold strap in half again and press.


4. Topstitch down both sides of each strap the entire length of the strap.


5. Cut a 4-inch piece from the end of each shoulder strap to attach to the D rings. Thread the backpack straps through the slider adjustments and stitch. Baste the D ring tabs to the bottom corners of the bag. The straps go side by side at the center top of the bag. Baste in place and continue to attach the bag bottom and lining as instructed.


If you decide to make your own Natalie Bucket Bag and have questions about the shoulder strap treatment, ask away. I'd be happy to help!

Monday, February 6, 2017

Sweet Heart Valentine Centerpiece

With Valentine's Day just around the corner, I decided to share a quick project that didn't involve one stitch of sewing. It was easy and fun and makes a darling Valentine decoration.


You will need: 

  • Vase of your choice
  • Clear glass marbles or other vase filler
  • Scrapbook paper
  • Thin wire
  • Heart paper punch (mine is 1 7/16", but other sizes will do)
  • Ribbon for the vase, if desired
  • Branches (I bought mine at Hobby Lobby)
The process is so easy that it really doesn't need much explanation. The first thing you're going to do is to punch out a bunch of hearts. I found my cute paper at Hobby Lobby and used a 40% off coupon, but any color would work and it would be a great use of any scrap paper you might already have. The pad I used is 6"x 6" and there was plenty of paper for all the hearts I needed.


After the hearts are punched, take two different patterns to make a pair. Using double-sided tape, sandwich a wire between the two hearts to stick them together. Thinner wire is easier to wrap around the branches.


All that's left is to wrap the hearts around the branches to your heart's content and arrange them in a vase. Add a cute bow if you want and enjoy your sweet heart centerpiece!

A Little Mermaid

Who isn't enchanted by a mermaid? With this quick and easy pattern, you can make a mermaid for every little one in your life who wants to be one.  


I used this pattern by Bit of Whimsy: 

Pattern Here

The instructions suggested that the yarn pig tails are sewn into the seam. I got better results by adding them after the doll was finished and stuffed. I wrapped the yarn around my fingers until it was as full as I wanted and then stitched securely to both sides of the head by hand. 

The mermaids are only 12" so it's a great project to use some of the scraps we all have stashed in boxes and crates, cupboards and drawers. These little mermaids can't go in the water, but I know my sweet granddaughters sleep with their mermaids almost every night.

Monday, January 30, 2017

Pretty Princess Throw Blanket

When I found this Riley Blake princess fabric on sale, I had to buy it. Like so many other impulsive fabric purchases, I just wasn't sure what I was going to do with it. 


I had several yards, so I finally decided on some throw blankets for my darling granddaughters. I used the "Charming Baby Log Cabin" pattern by Threaded Pear. I bought it at a local quilt store, but it's also available at shops online. It's any easy pattern. If you aren't familiar with how to bind a scalloped edge, never fear. The instructions aren't very clear, but there are some good tutorials online. The scallops are my favorite part of the blankets.


I adore the fabric and the finished quilt is a good size for children. I had the blankets machine quilted at a local shop and I'm not crazy about how they chose to quilt it. I should have been more specific and would have preferred something more simple like hearts and swirls or swirls alone, but my granddaughters don't know that and they love using their blankets when they watch their favorite princess movies.